
The user manual was intended to be viewed or printed as a PDF so we recommend that you download it.
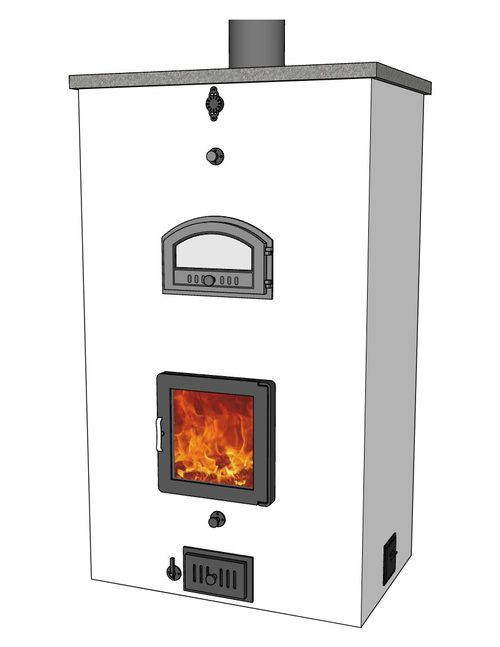
This user manual applies to Masonry Heaters built with Firespeaking components.
Table of Contents
- The Function of a Masonry Heater
- Curing Instructions
- Operational Parts Diagram
- Fueling Protocol
- Firing Instructions
- Gas Flow Diagrams for 5RO
- Reloading Procedure
- End of Fire Procedure
- Between Firings
- Use of Accessory Bake Oven
- Maintenance
- Troubleshooting
- Credits
This is version 1.0 of this manual, published and copyrighted October 28, 2026.
Model:
5RO (5-Run with Oven)
5R (5-Run)
Custom:
ST5RO (5-Run with Oven, See-Through Firebox)
ST5R (5-Run, See-Through Firebox)
Builder Information
Company:
Builder’s Name(s):
Address:
Phone:
Email:
Web/Social:
Date Completed:
Congratulations on your purchase of a Masonry Heater using Firespeaking Masonry Heater Kit Components! Anyone using this masonry heater must read and follow all instructions in this manual.
SAFETY RULES:
- It is essential that the operator understand the air/gas flow controls of the unit.
- The heater should only be fired with dry, seasoned firewood (15-20% moisture).
- CO detector(s) must be installed in the room(s) where the heater is located.
- Flammable liquids must not be used to start fires.
- Store all ashes in non-combustible containers in case of live embers.
- Place wood with care in the firebox. Throwing wood against the cast wall components can damage them.
- The chimney should be inspected at least once a year and routine maintenance listed in the maintenance section should be followed.
Heater facing may show hairline cracks due to thermal expansion. These cracks don’t affect performance and don’t create any safety or structural problems.
NOTE: These user instructions are provided for the 5-Run (5R) and 5-Run with Oven (5RO) Masonry Heater models. Operation of custom heaters may vary. Please contact the builder of your masonry heater with any operating or maintenance questions.
The Function of a Masonry Heater
A masonry heater is an appliance designed to cleanly and efficiently convert firewood into high quality and long-lasting warmth for your home.
In contrast to the traditional fireplace, a masonry heater’s efficiency is derived from both optimized combustion and heat exchange. Understanding how to build a fire and use the available air controls on your masonry heater is essential for achieving the cleanest and most efficient burn. Optimizing the storage of the heat generated by the fire depends on a good understanding of the internal workings of your masonry heater.
In general, masonry heaters function on the following simple principle: Once draft is induced in a chimney, it is possible to pull the combusted gases through a much longer pathway in order to maximize heat exchange. These internal channels allow for the storage of heat that can be radiated into the living space long after the fire has gone out. In this way, your masonry heater operates as a warm thermal battery that you can sit directly against to enjoy its warmth as well as feel the healthy kind of heat it radiates into your living space.
It is important to identify the bypass damper on your stove which provides for an easy way to create draft in the chimney before then closing it to draw the combusted gases through a longer pathway. Many stoves also have shut-off dampers which provide a way to isolate the heater from the rest of the chimney to reduce air exchange with the exterior when not in use.
During normal operation, a 2-3 hour fire made once a day will keep your house warm for 24 hours. This batch-style burn involves loading the full presumed fuel needed for heating the home that day at once, or with one half-batch reload, and making a hot fire to convert that fuel into heat energy that can be stored in the mass of the stove.
The time of day for this main firing depends a lot on the routines and lifestyle of the residents of the home. Some may enjoy making the fire as part of their morning routine and include it as part of their active and productive part of their day. Others may enjoy firing their heater as part of their evening experience when the activities of the day are winding down and there is time for connecting with loved ones and reflection. One of the great benefits of a masonry heater is that the feeling of warmth in the home is independent of the specific time of day that the fire is made.
We wish you many years of enjoyment with your masonry heater and encourage you to share your experience of this resilient technology with friends and online communities to help spread the word! You can also visit forums.firespeaking.com to post questions and find answers.
Curing Instructions
IMPORTANT: A specific protocol must be followed when a masonry heater is first being commissioned.
Initial Drying
New heaters must first be allowed to dry completely from the construction process.
It is helpful to open all operable openings including the firebox door(s), oven door, ash door, and cleanouts during this time to allow air to circulate inside the unit and assist with the drying process. Fans directed toward the heater can accelerate the drying process. This phase can take between 1 and 4 weeks depending on site conditions.
Curing Fires
A series of intentionally staged, progressively larger fires allows the heater components to complete their curing process.
Build a sequence of progressively larger curing/break-in fires. Build 2 fires per day, at least 8 hours apart, for 9 days, beginning with 5-8 lbs of firewood for each fire on Day 1, 10 lbs each on day 2, 15 lbs each on day 3, and continue adding 5 lbs per day until you have reached a standard firing load of 45 lbs. Please refer to the regular firing instructions to understand operation of the air controls and the bypass damper on the unit while firing during the seasoning period.
This sequential process drives off free moisture and then chemically-combined water in the cast components safely without causing steam spalling (explosive cracking). Failure to follow this protocol may damage the components.
Paint on the metal parts may smell during the initial firings. In some cases, it may be necessary to take precautions such as opening windows to ensure healthy air flow during this process. This smell should go away as you complete the curing process.
Subsequent Seasons
It is customary to begin a season with a smaller than full load to drive latent humidity out of the unit but it is not necessary to repeat the curing process.
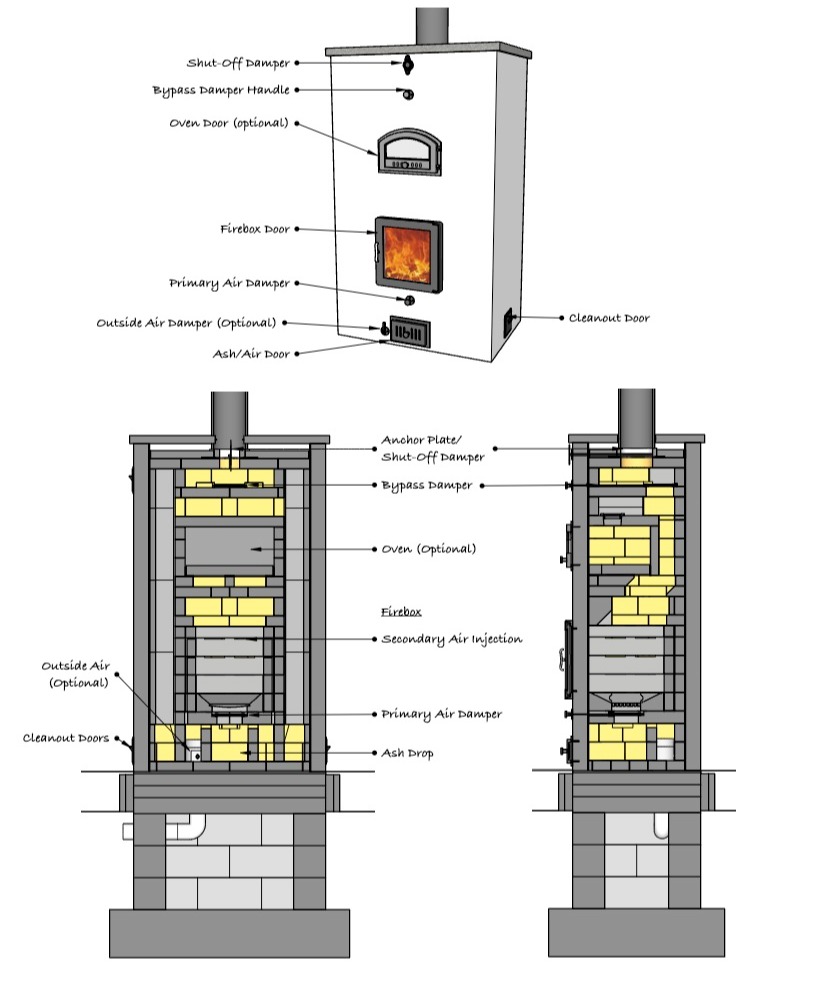
Operational Parts Diagrams for Standard 5-Run with Oven (5RO)
Refer to this drawing when reading firing instructions
Fueling Protocol
Firewood
The masonry heater is designed to burn seasoned cordwood. Do not burn coal, rotten wood, waste, painted or treated wood, plywood, OSB, plastic, sawdust, or any flammable liquids.
Our heaters are designed to operate with standard 16” length firewood. Your main firewood should ideally be a mix of 4-7” diameter pieces with smaller kindling and transitional pieces stored separately. Both soft and hard wood can be used, with a mix being optimal.
Firewood should be stored under cover and must be seasoned for at least one summer to reach a moisture content of 15-20%. Burning unseasoned or wet wood results in poor combustion which pollutes the environment and can coat the inside of your heater with creosote.
Ash Management
The firebox should be swept of ash before each firing and the ash receptacle should be emptied regularly.
Before making a new fire, open the sliding (primary air) damper below the grate by pulling the knob toward you all the way until it stops. Sweep the ashes over the grate and down into the main ash receptacle. Any unburned coals that remain can be left to become part of the next fuel load.
It is important to inspect and empty your ash receptacle area regularly. Open the ash box door and pull the provided ash drawer out to remove the ash. You may need to repeat the process, using the ash drawer as a scoop, to empty the ash receptacle area. It is essential that the ash receptacle area is emptied regularly to ensure that internal air passages do not get blocked.
While we recommend returning ash to fields and forests, be aware that embers can sometimes still be active in ash loads so inspect them carefully before disposing of them and ensure that no live embers are present. Always carry and deposit ash in metal containers.
Firing Instructions
- Open the Chimney Shut-Off Damper
In standard installations, this damper will be located in the higher portion of the heater and near the chimney connection. The handle is horizontal when closed and vertical when open. - Open the Bypass Damper
Pull the knob of the bypass damper towards you. This opens a path that allows the combusted gases to temporarily bypass the heat exchange channels and go straight to the chimney. This provides an easy way to establish draft in the chimney. If the heater is cold, it may be necessary to leave the bypass damper open for 10 minutes, then progressively closing it over another 10 minutes. If the heater is warm, it may not be necessary to open the bypass damper at all. Experiment to find what works for your heater. - Open the Firebox Air Controls
3.1 Open your main air supply to the firebox.
If your heater is equipped with outside air, open the outside air control to the fully open position. In a standard installation, this will be a lever which is at the same level of the ash door and is closed when horizontal and open when vertical.
If your heater uses room air, the ash box door is your main air control. Depending on the ash box door hardware, you will either tilt the top of the ash box door toward you to administer air, slide open the air register on its face, or open the door as necessary.
3.2 Open the primary air damper by pulling it toward you.
The primary air damper provides under-fire air through the grate. Underfire air is helpful at the beginning of a fire to develop momentum in the chain reaction. As the fire continues and the fuel and firebox temperatures rise to produce active gasification of the firewood, the primary damper can be progressively closed to rely on secondary air injection on the sides and top of the fire for combustion air. Preserve a small amount of primary air throughout the burn cycle.
3.3 Open the air wash register on the firebox door(s).
Depending on your door, you will either have a knob which you can turn counterclockwise or sliders at the top and bottom of the door which you can open to provide air to the firebox. While this air source is not sufficient on its own for healthy combustion, it is a useful additional flow and helps to keep the glass on the door clean.
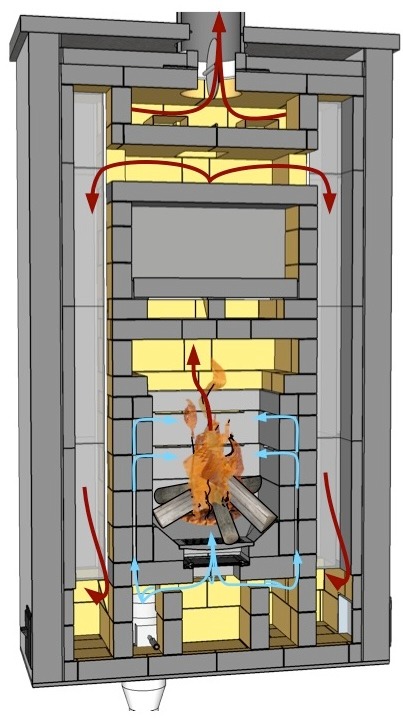
Gas Flow Diagrams for Standard 5-Run with Oven (5RO)
Blue arrows indicate air flow and red arrows indicate combusted gas flow.
- Load batch of fuel in firebox. A “top-down” fire is recommended for the cleanest burning results.
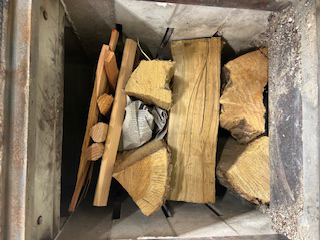
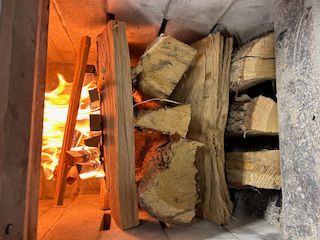
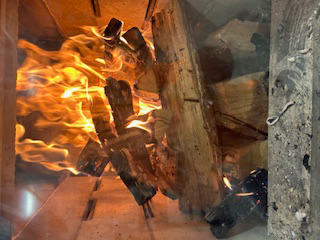
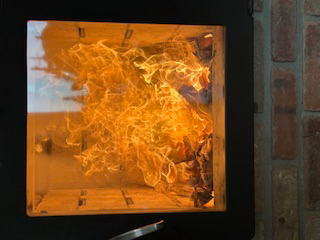
A masonry heater is designed to be burned in “batch” fashion. This means that you will place an amount of fuel in the firebox based on your anticipated heating needs over the next 24 hours. While the firing process may occur over 2-3 hours, the heat generated when properly fired will radiate well into the next day. A full fuel load is 45-50 lbs of firewood. The heater can be fired with anything from a half load to a full load.
Begin with the largest pieces (5-7” diameter) on the bottom. Gradually reduce the size of your firewood and alternate orientation between layers to maximize air flow between the pieces of firewood. The door glass stays cleaner if there is a gap between the wood and the glass. Prepare your paper and kindling nestled into the top of the stack. A fuel load prepared in this way will burn from the top down resembling the way a candle burns. This strategy avoids having cold fuel on top of your fire which can result in incomplete combustion.
- Ignite and Adjust Air and Gas Flow Controls During Batch Burn
Building your fire and adjusting the controls on your unit is an art form. Your masonry heater has been crafted to optimize combustion and make the most of your fuel. Experience and experimentation with your controls will allow you to develop an understanding and intuition about your settings.
5.1 Once the fire is burning well, close the bypass damper.
This important step sends the gases through the full heat exchange pathway of the masonry heater and is what allows the heat to accumulate in its mass. Failure to close the bypass damper will drastically reduce the heat exchange efficiency of that fuel load and can strain the chimney.
5.2 As the fire’s momentum increases, gradually close the primary air damper.
Reduce the amount of primary air coming up through the grate so that the main part of the fire is mostly fed by secondary air coming in through the slots in the walls of the firebox. Achieve this balance by sliding the knob below the firebox door towards the heater, leaving approximately 1” of the shaft showing.
5.3 Adjust overall air intake as necessary during burn.
If the firebox is visibly smoky and the fire is struggling to stay lit, there is not enough overall air in the firebox. If the fire is making a loud humming and there are a lot of sparks, it is an indication that there is too much air entering the firebox. Adjust your main air control (outside air damper or ash box door) based on observation. Aim for lively combustion and do not “starve” the fire of air.
Reloading Procedure
A masonry heater is not designed to be fed continuously like a woodstove. When heating needs require more warmth than generated by one full batch per day, consider either reloading with up to a half batch or moving to two firings per day.
The moment to reload is when the main fuel load is reaching the end of its vigorous flame stage and there is a healthy bed of coals. Temporarily open the bypass damper before opening the firebox door and place your second batch, not exceeding a half load.
Overfueling your heater with multiple loads in one firing can cause damage to your heater and is less efficient than completing your firing and shutting the heater down. This process allows the heat concentrated on the inside of the channels to travel outwards into the mass and prepares the heater for better heat exchange during the next fire. The maximum heating capacity of your heater is achieved with two firings a day, each with 1 ½ loads of firewood.
End of Fire Procedure
Properly shutting down your heater’s controls at the end of a firing maximizes the heat retention of your unit. Close the air and gas flow controls in the reverse order that you opened them in the firing instructions.
There is a phase towards the very end of the firing when the coals have reduced to embers that the net heat production of the firing may be eclipsed by the cooling effect of generous air flow through the heater. It is possible to accelerate the end of the firing by concentrating the coals above the grate and reopening the primary air damper to speed up the completion of the coal stage. Another option to accelerate the end of the firing is to completely shut all of the air intakes (outside air, ash door and firebox door). This approach relies on these controls having tight, well-gasketed seals and effectively extinguishes the remaining coals which can later be included as fuel in the next firing or used in the landscape as “biochar”.
The bypass damper can be reopened at this stage to “burp” the heater of any remaining combustion gases.
Only close the shut-off damper once there are no longer any red embers in your firebox.
Between Firings
Bringing firewood into the home for any amount of time before it is used allows even well-seasoned firewood to further reduce its humidity level. It is an interesting practice to pre-load your next batch of firewood in a warm firebox before you plan to use it to further dry the fuel. This should only be done after sufficient time has passed since the last firing to prevent unintended over-drying, charring, or even self-ignition of the fuel.
Using the Accessory Bake Oven
The oven is not designed to have a live fire in it! It cooks with accumulated heat from firings in the firebox. It peaks in temperature toward the end of a firing and gradually reduces in temperature throughout a 24-hour time period providing for a wide range of cooking opportunities and styles.
Operations
The air register in the oven door should not be used. The only exception is when wanting to create a slight draft to vent any smoke buildup in the oven.
The cleanout at the top of the oven has two purposes:
- To act as a soot cleanout for the gas channel above the oven. This is one common constriction point caused by accumulation after seasons of use and soot/ash deposit and should be inspected as part of the annual inspection. It can be opened by pushing up on it and sliding it along the roof of the oven. Caution: it may be hot when attempting to move it.
- To provide a way to vent smoke caused by burning food residue in the ovens. Be careful of spills and burnable deposits such as flour or oil on the oven floor that can burn and produce smoke. A removable soapstone tile floor lining can be a good strategy for managing any smoke-causing spills.
Recommended Baking Temperatures:
Pizza and bread are ideally baked at the highest temperatures (~450-550° F).
Casseroles and other savory dishes can be cooked in the middle range (~350-450° F)
Desserts can be cooked in the lower ranges (~300-350° F)
Slow cooked roasts and beans can be cooked in the lowest range (~200-300° F)
Maintenance
Ash should be removed from the ash drawer weekly during the heating season.
A masonry heater should receive a full internal inspection at least once a year to ensure proper performance. Action should be taken when necessary to ensure that accumulated soot and fly ash deposits do not block the air and gas flow inside the unit.
A masonry heater should be inspected by a trained chimney professional at least once annually before each heating season.
Routine maintenance should include:
- Inspection of chimney. Sweep when necessary. Metal chimney pipe must be cleaned with a poly or nylon brush. Do not use a metal brush on Class A chimney pipe.
- Remove each cleanout door on the unit to inspect and assess the overall condition of the inside of the masonry heater.
- Vacuum accumulated soot and ash to ensure proper function.
- Check gaskets and operation of all controls.
Keeping the glass clean is also an important maintenance operation in order to both enjoy the sight of the fire as well as to be able to clearly see and respond to the state of the fire. Dipping newspaper in ash and using it as a gentle abrasive as you wipe the glass can be a practical way to regularly clean the glass. Using stronger fireplace glass cleaning solvents can be effective but should not be done when the firebox is still significantly hot after a fire.
Troubleshooting
Problems can be prevented by performing regular maintenance and ensuring that every operator of a masonry heater is well-informed.
Problems & Solutions
We recommend that you have a trained chimney professional inspect and clean your masonry heater once a year before the heating season to prevent possible issues. You can also consult the builder of your masonry heater for model-specific issues. The following suggestions are provided to help you understand simple fixes to common problems.
- Smoke is pouring out my firebox door!
The most common cause of smoke spillage is ignition without establishing sufficient draft. Make sure that both the shut-off damper and the bypass damper are open at the beginning of your firing, as well as firebox air controls. Only close the bypass damper once the fire has achieved significant momentum. Sometimes it is necessary to temporarily remove cleanout doors and visually correlate the position of the dampers with their handles to ensure that they have been installed and you are perceiving their setting correctly.
Also check that all of the cleanout doors are in position, and sealing their respective openings including any cleanouts in the basement. Any openings in the channels will significantly reduce the differences in pressure required to establish good draft.
If the problem persists, it is likely that you have an internal blockage in either the internal channels of the heater or the chimney caused by accumulation of soot, fly ash, creosote or animal intervention. The most common locations of blockages are due to fly ash accumulation on the shelf above the oven and at the bottom sides where the gases transition from downdraft to updraft. Light fly ash can be removed using a vacuum with adequate filters.
If your chimney cap is fitted with a screen that performs the function of a spark arrestor, double check that it has not formed a film of soot that is creating a blockage. Burning unseasoned wood can sometimes cause this to happen. Any blockages at the chimney cap will need to be cleared for successful operation of your unit.
- The fire is not burning very well inside the firebox! My firebox door glass won’t stay clean!
These issues are most commonly caused by insufficient air supply to the firebox. Please re-read the firing instructions and follow all of the air control recommendations. Make sure that all of the air intake conduits are free from blockages. With outside air, make sure that the whole conduit, including the meshed air intakes at the exterior or in the crawl space are free from blockages. For ash drawer air administration, make sure that the ash area is not so full as to block underfire and overfire air.
Firebox door glass will accumulate combustion residues over time and need cleaning. See maintenance section for further instructions. If you feel that your door glass is sooting over unduly quickly, place your firewood further away from the door and make sure you are using the air register on your door as one of your air controls. This specific air control creates an air wash over the door glass which can help to keep the glass clean. You can try balancing the air intakes by opening your door register all the way and reducing slightly your main air intake so you have a more aggressive door air intake, but not at the expense of the overall volume of air necessary for healthy combustion.
- My house smells like smoke and I don’t know why!
This is usually the result of shutting the shut-off damper before the fire has sufficiently completed its process. If you need to leave the heater unattended for an extended period of time towards the end of the burn, you can close the air intakes to reduce and stop flow inside the heater without losing too much heat up to the chimney, and then close the chimney at the shut-off damper when you are available to attend to it.
If your heater was built without correctly respecting clearances to combustibles, the smell of smoke may indicate an overly hot or smoldering material in your house and should be examined immediately by a professional who is able to further assess the situation. - The fire is burning too vigorously!
Reduce air supply by partially closing the outside air supply or ash door (do not fully close during active firing). Close the bypass damper. - The heater is cooling too quickly after a fire!
After the fire is completely out, all dampers and air supplies should be closed to prevent air drafts through the heater. Check that shut-off damper, bypass damper, outside air damper and/or ash box door (as applicable) and firebox door air intake, are all closed.
Credits
This user manual, along with overall masonry heater development at Firespeaking, has been the cumulative effort of many individuals. This document was authored by Max Edleson with important editorial input from Jeremiah Church and Fred and Rod Kaufman. The overall project has received many valuable inputs with special thanks due to Jerry Frisch, Norbert Senf, Alex Chernov, and Fleming Abrahamson for their mentorship over the years. The Masonry Heater Association (MHA) has created a valuable container throughout the years to maintain a community of experienced professionals in the industry. Also special thanks to Eva, Ayla and Zoe Edleson for their part in making all of this possible.